The following document gives an overview on how to install and use the 3d Model VIS widget. Please ensure to always read the manual that corresponds to the widget version you are using, to avoid any confusion. At this point in time all functions offered by the widget are potential subject to change, so the content of this manual may differ greatly depending on your widget version.
The main idea behind this widget is, to allow experienced users to embed their own 3d visualizations (e.g. of house floors) in ioBroker VIS, while keeping them fully interactive and in-sync with the state-objects maintained in ioBroker itself. In contrast to using pre-rendered 3d models as simple JPG/PNG background images, the benefit here is that 3d models can be viewed from all angles and objects (e.g. blinds, lights, doors, etc.) within the model can be updated in real time by using animations.
At its core the 3D Model widget uses ThreeJS as render-library. 3d models itself need to be available and uploaded as GLTF files. If you experience glitches while loading your 3D model, please also take a look into the forum there, as there might be a lot of answers to your problem already.
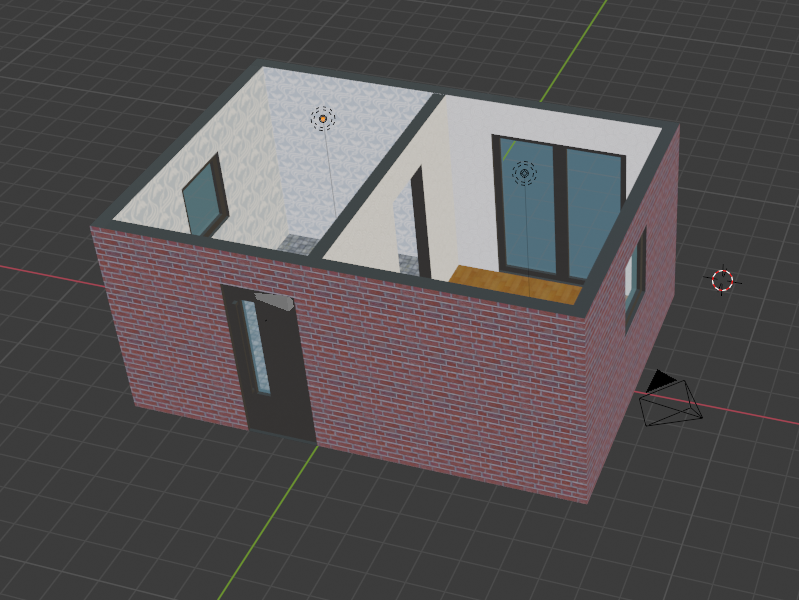
If everything is setup correctly, this (or hopefully more beautiful) is how your house-model could look like:
1. Installation
At this point in time the 3dmodel widget was not added to the ioBroker stable-repository, meaning you will have to install it directly from source.
To achieve this, perform the following steps:
-
It is expected that ioBroker VIS (Adapter: Visualisation) is already installed and a valid license key is configured.
-
In ioBroker admin GUI, go to Adapter and click on the Github Icon (
 ) to Install from custom URL. In the next dialog switch to the tab CUSTOM and copy https://github.com/Excodibur/ioBroker.vis-3dmodel into the field URL or file path. Press Install to start the installation of the widget.
 -
If you experience issues while using the widget, please also take a look at the chapter Known Issues/Workarounds.
1.1. Known Issues/Workarounds
The following issues were observed during development and likely will reoccur for other users, hence this section covers known workarounds for them. Some of the issues described here are already being fixed, or formally addressed, but still exist at the time of writing this document.
Recent issues can also be found here: GitHub 3D Model Widget issue tracker.
1.1.1. Problems with loading model (CSP)
|
The workaround described below is only required, if VIS adapter older than v1.3.8 is installed. With this and newer releases the Content Security Policy now includes the fix already. For more details, please take a look at this ticket. |
-
The Content Security Policy that is enforced by ioBroker VIS by default will likely cause issues on client-side, if a GLTF model is loaded that contains Materials and Image Textures. It is correctly displayed in edit-view, but in the regular end-user view it appears as black box, since it was not properly loaded. In the web-console of your browser you will find numerous errors related to the Content Security Policy. ThreeJS, the 3D render library used within this widget loads some resources as blob data, which by default is blocked by the CSP the VIS adapter uses.
-
The solution is to change the VIS config file
<iobroker-home>/node_modules/iobroker.vis/www/index.html
-
<meta http-equiv="Content-Security-Policy"
          content="default-src 'self' * 'unsafe-eval' 'unsafe-inline'; style-src 'self' 'unsafe-inline' *; img-src 'self' 'unsafe-inline' * data:; media-src 'self' 'unsafe-inline' *; connect-src 'self' 'unsafe-eval' 'unsafe-inline' * ws: wss:; script-src 'self' 'unsafe-eval' 'unsafe-inline' *">
to
 <meta http-equiv="Content-Security-Policy"
content="default-src 'self' * 'unsafe-eval' 'unsafe-inline'; style-src 'self' 'unsafe-inline' *; img-src 'self' 'unsafe-inline' * data: blob:; media-src 'self' 'unsafe-inline' *; connect-src 'self' 'unsafe-eval' 'unsafe-inline' * ws: wss: blob:; script-src 'self' 'unsafe-eval' 'unsafe-inline' *"> (1)| 1 | Notice that for content types img-src and connect-src both blob: was added. |
And then restart VIS via GUI, or CLI. However sometimes updating old or installing new widgets overwrites this setting again, so this is not a permanet fix. It is checked, if this can be changed in the core code.
2. Usage
Once all installation steps are completed, the widget should be accessible in the VIS toolbar. The widget itself allows users to upload GLTF files containing the 3d scene information to VIS and then to embed it onto any page.
3. Preparation
While the widget can render the 3d content of GTLF files, these first need to be created, exported correctly and then setup in the widget. This chapter considers preparation tasks that need to be completed, before using the widget.
3.1. Creating a 3d model
There are multiple ways to generate a GLTF file, as there are exporters available for most widely used 3d-suites, including Blender, 3ds Max, Cinema4d and Maya.
This guide mainly focuses on Blender >= v2.8. Older versions of Blender can also be used, but from v2.8 on the GLTF exporter is included natively and showed the most promising results during tests.
As creating a sophisticated 3dmodel is no small task, it requires knowledge that cannot be taught within this documentation. Instead, this chapter focuses on aspects of the modeling process that are related to limitations of the widget and the 3D libraries it uses. The points described here center around modeling in Blender, but likely can be applied in some sense to other 3D-modeling tools as well.
 Blender is a complex tool and with a good amount of know-how designers can create photo-realistic models and complex animations. But most of those effects are only possible, because professional 3D tools don’t render sophisticated models in real-time and take up to minutes or hours depending on the complexity of scenes. Since this widget uses the ThreeJS library and the GLTF-format to render models in real time, it is safe to state that a lot of things that can be done with Blender simply won’t work in this widget.
It is advised to take a close look at the ThreeJS documentation, the ThreeJS live examples, as well as the GLTF specification to get an idea, what is possible.
In addition, there are some personal findings during development:
-
Complex Material Shaders are not supported (e.g. Glass BSDF). Simpler shaders (e.g. Principled BSDF) work fine though. So no realistic light refraction through glass, but textures can be made transparent.
-
A lot of Modifiers (e.g. Boolean) don’t make it into the final GLTF file, unless they are applied fully.
-
GLTF animation support seems limited. Basic Mesh transformations (scale, rotate, position) work, but keyframes set to other object attributes (e.g. power-attribute for light-source) are apparently not supported.
-
If in the 3d Model Widget shadow-rendering is enabled, there will be weird artifacts if double-sided materials are used. In Blender this can be avoided by activating "Backface Culling" for each material.
-
If later in the 3d Model Widget textures are not rendered for the model:
-
Check if normals are inverted (red in Blender with Face Orientation activated in view") and fix them
-
Unwrap textures in UV editing mode to see if the then show up in GLTF.
-
Animations, if used, should be stored as separate NLA tracks in Blender with proper names, so they can be distiguished later in the widget. As mentioned, not all animations that can be implemented with Blender can be exported within the GLTF-file, only the ones based on simple transformations.
3.2. Exporting the 3d model
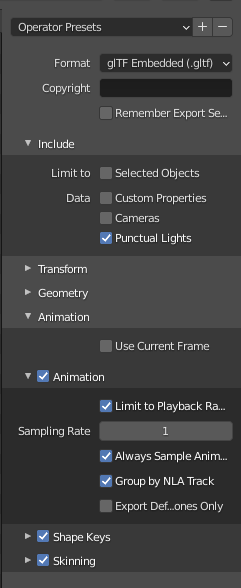
The GLTF-export-dialog shown on the right hand side contains mostly the default values set by Blender. Make sure to use the right Format, to include Punctual Lights (if you have lights in your model) and Animations that are Grouped by NLA Track (if you want to use animations).
Only .gltf files should be uploaded to VIS file-manager. At first glance it looks like .glb files can be uploaded as well, but when used the server does not deliver them correctly as the mime-type needed for it is not supported. However .gltf is basically just a large JSON-file and that can be served just fine.
It is a good idea to check the validity of your export GLTF-file, before using it in the widget. The publicly available online GLTF Viewer provides an easy way to test any GLTF file you export. It is not in any way related to this widget and helps to distinguish between issues caused by the widget and issues as a result of export- or modeling-errors in your Blender project. Only if it works properly in such viewers, it will work flawlessly in the widget.
3.3. Setting up states (optional)
Although not required, one of the key features of this widget is the ability to react to states maintained in ioBroker to update the model in real time.
States (sometimes also refered to as Datapoint) can be used in conjunction within light-sources, as well as animations of the 3D model. Currently there are two types of states supported:
-
boolean: Toogles entities of the 3D model.-
Lights are turned on or off.
-
Animations are played once.
-
-
number: Dynamically changes entities of the 3D model.-
Lights are basically dimmed smoothly.
-
Animations are played partially, depending on the state-value.
-
For more information please refer to Lights and Animations chapter.
4. 3D Model Widget
The widget itself can be used like any regular widget in iobroker VIS. It should look similar to the following figure:

-
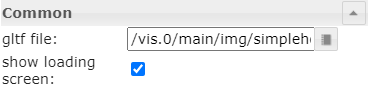
gltf file: To work properly, a valid GLTF file needs to be uploaded to ioBroker VIS file manager (Setup→File Manager…) and referenced in the widget attributes underGeneral/Common/gltf file. -
show loading screen: Show a small animation (moving boxes) while loading the model. Otherwise a black box will be shown until the model is loaded.
|
If a exported GLTF file is valid, can be checked easily beforehand with available online tools, like GLTF Viewer. |
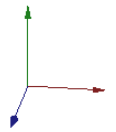
|
Refer to the colored 3d-axis on the left bottom of the model (only visible in edit-mode) when positioning the model and camera via X-axis, Y-axis and Z-axis. |
|
Although the GLTF file upload succeeds, it is likely that the GLTF file will not show up in VIS file manager. It can be referenced by path anyways. |
4.1. Model
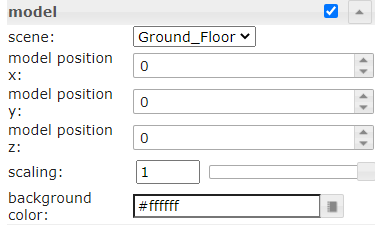 The following settings are available to position and size the model properly to the viewport:
-
scene: Every GLTF file should contain at least one scene containing meshes, lights and animations. Scenes in ThreeJS eqaul scenes used in Blender. In the smarthome context scenes can be used to keep data from different floors (or even rooms) separated, but still in the same model. -
model position x/y/z: Position of the model on each axis in 3D space. Setting0here is sufficient for most scenarios. -
scaling: This setting allows you to scale your model up or down. A similar effect can be achieved by changing the camera settings which is more complex, so this setting here is mostly there for conveniance. While the scrollbar allows the model to be scaled up to 10 times of its original size, the input box can be used to scale even higher than that. -
background-color: The default two-dimensional background color for the rendered model can be set here.
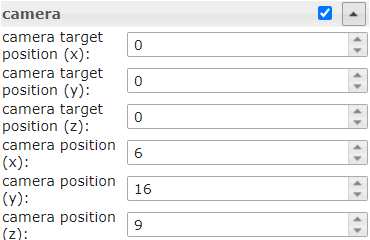
4.2. Camera
In this widget the camera always orbits around a target (aka your model), which allows for a free 360 degree rotation into every direction of 3D space.
-
camera target position (x/y/z): As you normally want the camera to exactly rotate around your model, it is advised to use the same settings here as forModel/model position x/y/z. -
camera position (x/y/z): This is starting position of your camera "in orbit" and given distance and angle tocamera target positiondecides what users will see from your model when loading the page initially. Once the widget is fully loaded, by dragging or scrolling you can change the camera position in real-time to inspect different parts of your model.
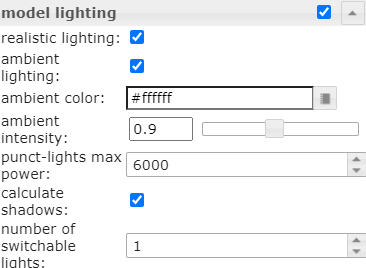
4.3. Lighting
Lighting is a key feature in this widget to propery illuminate the loaded 3D model.
-
realisic lighting: Enables more realistic, physically correct, but more cpu intensive lighting. See also ThreeJS docs. -
ambient lighting: Globally illuminate the whole scene equally. See also ThreeJS docs. -
ambient color: Color of ambient lighting. -
ambient intensity: Intensity of ambient light. In physically correct mode, intensity is interpreted as luminous intensity measured in candela. -
punct-lights max power: Default intensity of all punctual lights in the scene. Can be overwritten with Switchable Lights /light max power. -
calculate shadows: If activated, all objects in the scene will cast and receive shadows. -
number of switchable lights: Number of lights that should be bound to ioBroker states. Opens up new submenues. See chapter Switchable Lights.
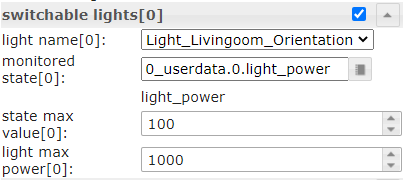
4.3.1. Switchable Lights
Besides permanent light sources, it is also possible to configure switchable lights which can be bound to IoBroker states.
-
light name: Light object from 3D model that should be linked to state. For punctual lights the GLTF format supports Directional, Point and Spot lights. -
monitored state: ioBroker state to bind light to. -
state max value: Max value the ioBroker state can have.[1] -
light max power: Light intensity/brightness. In physically correct mode, the luminous power of the light measured in lumens.
Regarding light intensity being measured in lumens, it is questionable if real-life values are sensible to be used here. Although not fully verified, how bright a light-source will appear in the rendered object also depends on the dimensions of your model. E.g. a house model might look fine while rendered, but if it not also does match real-life metrics (e.g. wall height of rooms), a normal lumen-intensity will not provide enough light for the whole room.
The monitored state can either have a number, or boolean value. If a number is set as value, it must not be greater than state max value and the light will be dimmed according to the state-change. If boolean is used, the light will either be turned off (false), or turned on (true), meaning set to state max value.
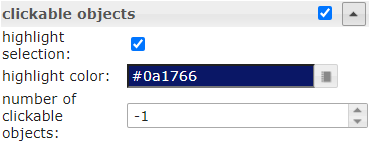
4.4. Clickable Objects
Apart from binding Animations and Lights to states, it is also possible to make every object in the scene clickable. Once clicked upon, the value of the associated state is changed, e.g. to trigger the execution of customer Javascript.
-
highlight selection: Highlight selected objects in 3D view. If a mouse is used to interact with the 3D model, objects will be highlighted already on mouse over, otherwise only when clicking on them. -
highlight color: Color of the highlighting-effect applied to objects. -
number of clickable objects: Number of objects in model that should be clickable. Opens up new submenues for configuration.
Each clickable object can be configured as follows:

-
object name: Name of the clickable object. -
changeable state: The state that will be changed when clicking on the object. -
action: This setting defines how the state value will be altered:-
enable: Set value totrue -
disable: Set Value tofalse -
toggle(default): Inverts the current state value, e.g.falsetotrue, andtruetofalse:
-
The idea here is to use further adapters (e.g. ioBroker Javascript Adapter) and bind them to changeable state. This reduces complixity of this widget, while allowing users to utilize the full capabilities of customly written Javascript.
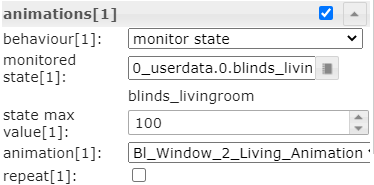
4.5. Animations
The animation system within this widget is rather complex and based on the ThreeJS library. Please also take the ThreeJS Animation System documentation into account when working with animations.

-
number of animations: Number of animations to configure. Opens up new submenues.
Each animation can be configured as follows:
-
behaviour: Decides under which conditions the animation is played:-
monitor state: Plays the animation in sync with a ioBroker state. -
auto play: Plays the animation as soon as the model is loaded.
-
-
monitored state: ioBroker state to bind animation to. -
animation: Animation for which this configuration applies. -
repeat: Loop the animation, instead of playing it just once. Mostly used in conjunction withauto play. -
state max value: Max value the ioBroker state can have. This value is used, when the ioBroker state referred to is of type number (not boolean!).[2]The widget then assumes that the state can be set to a value from 0 tostate max value. Defaults to 100. See further explanation below.
When Animations are turned on, they will just play once, unless configured to repeat. Typical smarthome scenarios could be opened/closed doors, windows, or other devices that can be toggled.
With a configured state max value (the highest value the monitored state can have) it is calculated relatively, up to which point an animation is played. E.g. a window-blind animation is played up to 50%, if the state value indicates the blinds are closed that much (e.g. current state value: 50, state max value: 100). If the state value decreases after that (e.g. because blinds are opened more and only 30% closed) the animation will play in reverse up to that percentage.
4.6. Debugging
This settings-section is mostly intended for developers.

-
loglevel: Defines the loglevel (per widget) of messages written to Browser console-
silent: Don’t log anything. -
error: Log only errors. -
warn: Log warnings, and everything mentioned above. -
info: Log basic widget information messages, and everything mentioned above. -
debug: Log debugging messages, and everything mentioned above. -
trace: Log even more debug-messages (trace), and everything mentioned above.
-